
Using and Making Screen Grabs
Sometimes it can be useful when trying to explain to another person how an operation is carried out using some form of software to take a screen grab. This image can make absolutely certain that your recipient will understand what you are getting at.
Sheila and I used them extensively when we wrote our on-line Digital Imaging course. We were using Photoshop Elements 2.0 at the time but the actual software is unimportant. In fact you can make a screen grab of any display on your screen.
To make the grab even more useful the grab can be ‘downloaded’ into, say, Photoshop or other image processing software. Having done this you can then add explanatory text with coloured arrows pointing at a critical spot.
These screen grabs can also be cropped and their pixel dimensions changed to minimize the final file size. Using the Save for Web control the file size can be further reduced with minimum loss of clarity. Sometimes you will find that it is better to use the GIF format rather than the normal JPEG format. This is especially the case when dealing with images that are of, say, a dialogue box that has lots of straight lines and there is no requirement for subtle tonal changes.
So how do we do this? Well all keyboards have a key that you may not have noticed is used before called Print Screen. This is normally situated next to the Scroll Lock key at the top right of your keyboard.
Now follow these instructions for a trial use of the Screen Grab.
- Press the Print Screen key. Nothing appears to happen but your computer has taken a snapshot of your screen as it stands and presumably with this text on it.
- Assuming that you have Word or Wordpad or Wordpro any other word processor worth its name open click on the new page icon and then press Ctrl + V. Hey presto! The whole of your computer screen appears in miniature. Now in Word or any other program you can make changes to the image you see but these are limited in nature. This is where Photoshop comes to the rescue.
- Open Photoshop of any flavour and open a New page by pressing Ctrl + N. Choose a suitable size such as A4. Now press Ctrl + V as before and again the screen grab appears.
- Select the Crop tool. Ensure that the boxes are empty by clicking on the Clear button.
- Crop just the area of interest.
- Enlarge so that you can see this better. Improve your crop if necessary.
- You can now add an arrow by finding the Shapes tool in the toolbox.
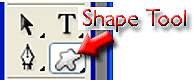
- Within the Shapes tool there is a Custom Shape tool from the fly out menu.
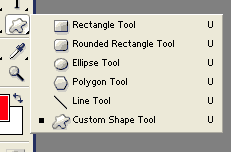
- Having selected the Shapes tool an Options bar for this tool appears at the top of the work area. Click where shown below to open the set of choices of shapes available.

- The standard set of shapes is shown here. As you can see there are other possibilities by clicking on the triangle on the right of the dialogue box. For this article I chose the third arrow and also ensured that my foreground colour was red. Then using the mouse you can draw the shape any size you want as well as elongate it as required. It will automatically fill with the foreground colour.
- You can go on and select the text tool and add words to clarify your meaning.
- Flatten the image.
- Go to File > Save for Web. In PSE 2.0 this is here
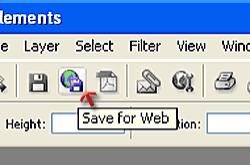
- The following palette appears.
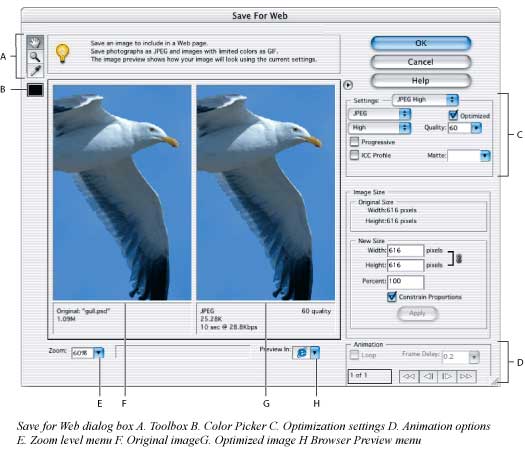
- In the area C you can decide to save in GIF or JPG or PNG and others. Additionally you decide on the quality and so the file size.
- Press the OK button and you are finished.
I hope that this will enable you to make the right decisions to construct useful screen grabs.
Note that all the pictures shown here were made with screen grabs; the first three from just one grab that was duplicated twice and cropped in different areas.
On Windows 7 they have now added a facility to make screen grabs. This is quite easy to use but one has little control over the size. Normally it grabs just a small part of the screen.
To use this you press the start key and in the Start Menu the Snipping Tool appears.
If it does not then type Snipping in the Start search box and the snipping tool should appear on the list. Right
click this and select Pin to the Start Menu.