This is an area of Practical Photography that we have so far not covered fully. Let me try to do that here.
Focusing Options. Note that within each of these are many variations from camera to camera.
1. Auto Focus
We generally use our cameras in this mode and it works well . There are times when this fails. The camera focused on the wrong thing. This is especially so when shooting through branches of a shrub for instance. Live View might assist but then how do you get the camera to focus correctly?
2. Manual Focus
One way to get around the problem is to use Manual Focus mode. You may not realise that your camera has a manual setting. However, I have looked through DP Review at compact cameras and as you can see below even old digital cameras had this ability.
3. Specifications for focusing.
A typical specification for a simple Compact camera is shown below
Focal length (equiv.) 41–123 mm
Optical zoom 3×
Maximum aperture F3.8
Auto focus
Contrast Detect (sensor)
Single
Live View
Digital zoom Yes (2 x)
Manual focus Yes (5 presets)
Normal focus range 50 cm (19.69″)
Macro focus range 3 cm (1.18″)
This is for a camera of 2001 a
Sony DSC-P30 1 Megapixel
Now notice these has all the items on current cameras including Manual Focus and Live View. This is rather surprising. Current models have merely complicated the way focusing is achieved.
For instance a very modern camera’s spec for focusing is below.
Focal length (equiv.) 24–75 mm
Optical zoom 3.1×
Maximum aperture F1.7–2.8
Auto focus
Contrast Detect (sensor)
Multi-area
Centre
Selective single-point
Tracking
Single
Continuous
Touch
Face Detection
Live View
Digital zoom Yes (4.3x - 6.2x)
Manual focus Yes
Normal focus range 50 cm (19.69″)
Macro focus range 3 cm (1.18″)
Having bamboozled you with numbers what do we learn from them? Firstly it seems all modern cameras are very similar in the ways they focus. But they all have Manual Focus. Now this is a very useful mode to use.
Manual focus is one of the most important tools in a macro photographer’s toolkit. When working at high magnifications, you cannot rely on a lens’s auto-focus capabilities for a couple of reasons.
First, Manual Focus is necessary for creative macro photography. In macro photography, particularly in more abstract macro photography, you have to make your point of focus count. Only by using Manual Focus, can you do so with the required pinpoint accuracy.
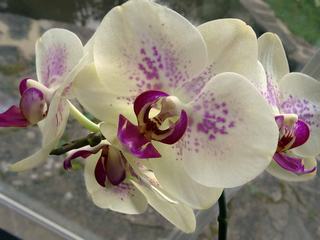
Second, some lenses especially macro ones tend to have relatively bad auto-focus capabilities, especially at high magnifications. It becomes frustrating to sit and wait while the lens pans back and forth (this is an even bigger problem in low light).
With a bit of practice, you’ll find that you can focus quickly and efficiently, and your keeper rate will immediately increase.
Aperture Control
Now manual focusing comes into its own for close up work. As you control the manual focusing you can also see the areas not sharp. If you now alter the aperture you can see how this changes the softness of these regions.
Image Stabilisation
It is no use focusing on a subject if there is camera shake. A tripod is thus crucial for close up work. Without a tripod some other form of stabilisation is needed. This could be a bean bag or a built in system known as Image Stabilisation.
The rule of thumb to determine the slowest shutter speed possible for hand-holding without noticeable blur due to camera shake is to take the reciprocal of the 35 mm equivalent focal length of the lens, also known as the "1/mm rule". For example, at a focal length of 125 mm on a 35 mm camera, vibration or camera shake could affect sharpness if the shutter speed is slower than 1/125 second. As a result of the 2 to 4.5 stops slower shutter speeds allowed by IS, an image taken at 1/125 second speed with an ordinary lens could be taken at 1/15 or 1/8 second with an IS-equipped lens and produce almost the same quality. The sharpness obtainable at a given speed can increase dramatically.
Optical image stabilisation or OIS has everything to do with the optics, hence, the name. ]
Basically there are two ways this is achieved 1) Lens Shift and 2) Sensor Shift.
1) Lens Shift does as its name suggests and moves an internal part of the lens using electromagnets. Vibration is detected using two piezoelectric angular velocity sensors (often called gyroscopic sensors), one to detect horizontal movement and the other to detect vertical movement. As a result, this kind of image stabiliser corrects only for pitch and yaw axis rotations. This was how it was done 10 plus years ago. Today motion in 5 axes can be corrected. These are axis rotation, horizontal rotation, vertical rotation, horizontal and vertical. This method is utilised by DSLRs and has the disadvantage that every lens has to have this system. Expensive and heavy. Acronyms for these are VS, IS, and AS. IBIS, OSS, OS, VC, SR and Pure View.
2) Sensor Shift is referred to as mechanical image stabilisation. The Sensor is moved to compensate for camera shake. Here the image can be stabilised even on lenses made without stabilization. Some cameras use both methods. Acronyms for these are IBIS, OSS, OS, VC, SR and Pure View.
3) Software is also employed to compensate for movement particularly for video work that many cameras now possess. Acronyms for these are EIS, OIS and DSP. Digital image stabilisation is great for both digital and smaller cameras as it doesn't require any additional hardware. This allows the devices to be made extremely smaller while all the processing is done by the image processing engine.
Some applications available for mobile devices also allow for EIS, as it is a software-driven feature and can be easily incorporated into existing devices.
Gimbals.
These are devices that hold the whole camera and bodily move it. Video camera men use devices such as the Steady Cam. But there are smaller gadgets to hold a mobile phone such as the one offered by DJI called the OSMO. The benefit of a gimbal is that it can offer image stabilization to the device, which does not feature it inherently. Note that some mobile phones [eg Samsung Galaxy Note 8] have dual OIS-based cameras. So no need for a gimbal. But then we do not own a helicopter or even a drone.
Creative Focusing
Whether you use auto or manual focusing do try to be creative. Get some parts blurred whilst others really sharp. This is called Differential Focusing
Conclusion
Of all the ways to focus the best is manual. But this is slow and hard to do with smaller cameras. Tripods could be required.
So we use the built in automatic focus. You have to remember that when pressing the shutter button the camera has to set the exposure and focus. It may be that the exposure for the area you focus on is not correct for the rest of the frame. Half pressing the button sets these and if this action is done whilst pointing at the area for critical exposure then the part needing fine focus may not be covered. What this means in practice is that taking a photo is a compromise.
Camera shake is the other area that needs addressing and today this is done with various methods of shake reduction. This will improve how sharp pictures are seen.
When we took slides I remember how much sharper my photos were when using a tripod. Now IS or VR or whatever enables us to throw the tripod away for most purposes.
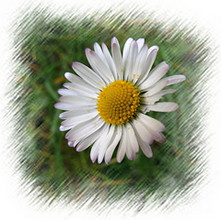
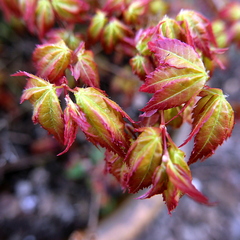
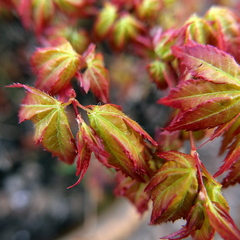
The daisy and first Acer leaves were photographed using Manual Focis and
the second Acer leaves used Auti Focus.