Why do we want to make a selection? Well you may wish to pick out a small part of a photograph and add it to another image or to a blank sheet when constructing a Birthday card.
Making a selection from an image can be a long and tedious process. It can also be a quick process depending on the complexity of the image. In most image manipulation programs there are several methods available to you. For instance the Lasso, the Marquee and the Magic Wand. Each have their uses. Each have their advantages and disadvantages.
You can try out any of these methods for yourself. Here we show you a method of working that has the following criteria:-
1. It produces a high quality cut out
2. It does not require lengthy learning
3. You can zoom in and out as often as you wish during the selection process
4. You can see what is happening easily
5. You are able to modify the cut out during or after the processing
6. The degree of feathering the selection in different parts of the selection is possible
7. You can leave the process part way through and return later
8. You can change the brightness and contrast so that you can see more clearly the edge
This is based on the use of Layer Masks and this will be explained below.
1. If the image is a Background make it into a Layer by double clicking the Background in the Layers Palette. The New Layer Box appears with Layer 0. Say OK to this. Leave the Opacity at 100% and the Mode as Normal. You have to do this because you cannot use a mask on the Background.
2. Activate Layer 0 and create a Layer Mask by clicking on the ‘Add Layer Mask’ button at the bottom of the Palette. The Mask will appear on the right of your active Layer 0. At this point it is vital when a Layer Mask is filled or painted with Black (the default Foreground colour) that part of the image is hidden and not visible (not lost however). If painted White then hidden areas are restored. If painted with Grey then the image is partially hidden. Only when the Layer Mask is APPLIED do the changes become permanent.
3. Start by using the Polygonal Lasso tool to go roughly round the subject. You will now have what are called the ‘crawling ants’
4. Invert the selection by going to Select > Inverse
5. Go to Edit > Fill and choose Foreground (which should be Black). Then press OK. Your selection will now appear on the chequered background with rough edges.6. Deselect by using Ctrl + D to remove the crawling ants.
7. Now we must remove the rough edges. We do this using a Brush tool and paint on the areas we wish to remove. Magnify your image to, say, 200% or 400%. Make the brush a reasonable size. The quick way to do this is by the use of the square brackets ( [ and ] ) to decrease or increase the size. Incidentally the softness of the brush can also be changed by pressing Shift key in conjunction with [ and ].
8. You will see that by painting the image is removed. If you make an error (as if!) then by pressing the x key the foreground and background colours swap round. Then when you paint you restore the image. Magic!
9. If the edge is hard to see you can adjust the brightness and/or contrast. The best way to do this is by use of an Adjustment Layer (of which more later). Click on the icon (circle half black half white) at the bottom of the Layers palette. A list pops out. Select Brightness and Contrast. Adjust to suit. This can easily be removed later even after saving your work.
10. When you are happy with your selection you Apply the Layer Mask by going to the Menu at the top of the screen and pick Layer > Remove Layer Mask > Apply.
11. From the File menu pick Save As. Use a new name for your selection. We will use such selections later for Christmas cards and the like.
One of the most useful aspects of PSE is the ability to select a part or parts of a picture in order to control these parts relative to the rest of the image. In this Unit we will attempt to show you how this is done and give examples of the usefulness of these techniques. This Unit is by no means an exhaustive treatise on selections but will certainly give you a good grounding and really all that you need.
Selections can also be used to either remove an area or copy an area for use elsewhere.
 SELECTION
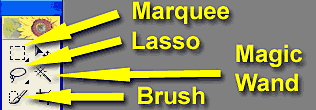
The tools for this task are as shown here at the top left corner of the toolbox. As can be seen there are four types available. Each type has its use.
The Marquee selection tool is used to select either rectangular or elliptical regions. The small triangle at bottom right indicates that there are more options available. In this case if you click and hold the icon a small menu flies out. You then click on the one you want. This applies throughout PSE.
The Lasso tool is used for irregular shaped areas.
The Magic Wand will select areas of an image that are of the same colour that you click on. There is a tolerance setting that lets the Wand pick colours that are darker or lighter (i.e. similar to) than the initial colour. If you make the tolerance 255 then the whole picture will be selected.
The Brush tool is for any shaped area and is used like, its name suggests, a brush.
RECTANGULAR MARQUEE OPTIONS BAR

Box 1 2 3 4 5 6 7 8
When the Rectangular marquee is selected this diagram shows some of the options that are available in the Tool Options bar. These sets of options are also available for the other selection tools except the Brush version.
Box 1. Note that the first box on the left with the rectangular marquee on a buff background can be clicked. The following box is opened.
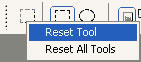
Here you can put all the tools or just the current tool back to its starting condition. This applies on all the tools not just the selection tools.
Box 2 or 3. The first option is that the Elliptical marquee (Box 3) can be selected here as well as from the
toolbox.
Boxes 4 to 7. The second option shows 4 small icons. These allow 4 options when selecting.
The first one lets you make new selections. If you have already made a selection and you decide it is the
wrong shape or in the wrong place you can simply start a new selection and the original one vanishes provided
that you start outside the old selection. You can also move the selection by putting the cursor inside the
selection area and then clicking and moving the area to a new place. Also note that you are able to make very
small but accurate shifts by using the Arrow keys. This is most useful in other applications too.
The second icon lets you add to a selection already made.
The third icon allows you to subtract from a previous selection.
The fourth icon allows you to make a selection that is the intersection of two selections. This is not often used.
Box 8. The box labelled Feather allows you predetermine the softness of your selection. However, selections
need to be different each time you require one and so we normally leave this as zero. We then pick the
feathering amount from the menu. That is Select > Feather. A box appears with a feathering amount
highlighted. Since it is highlighted and you wish to change the value there is no need to delete this figure.
Instead you simply type in a new number and the old one is replaced. Again this is the case throughout PSE2.
You may have noticed that there is a shortcut to feathering which you may like to adopt. This is Ctrl +Alt +D.
This brings up the box immediately.
All the selections have the Marching Ants and these can be hidden by going to View > Selection or Ctrl +H. This will toggle on and off by repeating the action. To remove the selection simply press Ctrl + D (for delete).
Box 9. The option labelled Style will not be discussed in this Unit but if you examine the contents you should find that their uses are, probably, self-evident.
Since it is easiest to understand how things work by example we will demonstrate using this picture of a village sign to try out each selection method.
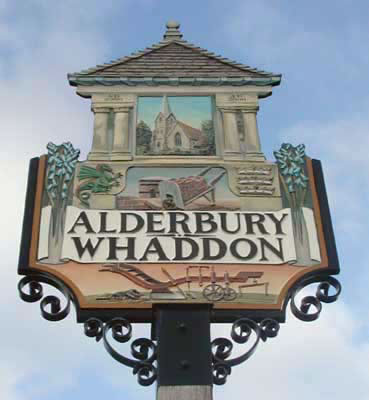
Village Sign
METHOD 1A
Marquee Method - Rectangular
Let us pick the Rectangular version and make a selection over the area of the church. This is done by clicking
and dragging the cursor diagonally over the region required as shown here.

Village Sign – Rectangular Selection
We now have numerous things we can do and we can only give you a smattering of ideas. The rest you will find by experimenting with all the controls available.
But, perhaps, the first thing to do is set the feathering as described above and then to Save the selection. This is done by going to Select > Save Selection. We have named this selection as ‘church’. If we lose the selection for any reason we can now find it by going to Select > Load Selection and picking the specific selection you want.
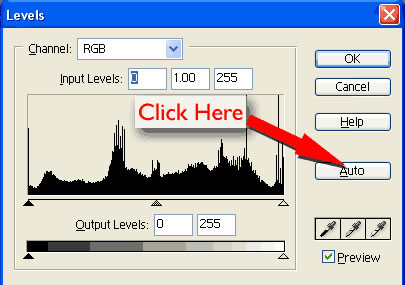
One of the major reasons for making a selection is to alter this area relative to the rest of the image. So for instance let us try the Levels control using the shortcut Ctrl +L. We have tried the Auto control as shown here. For completeness the same result can be obtained from Enhance > Auto Levels (shortcut Shift + Ctrl + L).
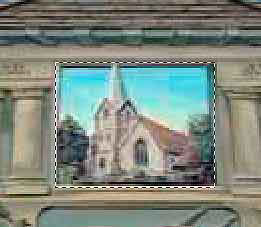
Village Sign – Brightened Selection
As can be seen the church is now brightened relative to the surrounding area.
Or maybe we would like to move the selection. To do this we use the Move tool at the top right of the toolbox
or by the shortcut method press the letter V on the keyboard. Then click and drag to a new position as shown
here.
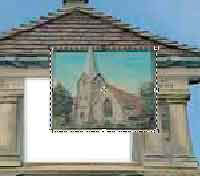
Village Sign – Selection Moved
As you can see this leaves an area behind filled with the current background colour (white here). Clearly this may not be the best idea. So I used Ctrl + Z to undo this.
However, by holding down the Alt key whilst clicking and moving will leave the original image behind and make a copy of the selection. This is shown below.
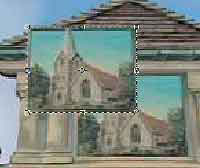
Village Sign – Selection Moved with Alt control
Note that this new copy can be rotated by moving the cursor outside the area with the Marching Ants near a corner when a curved double-headed arrow appears.
An exciting use for selecting is to transfer it to another image. Let us try this by opening another photograph. This time of a map of the village which shows the position of the church. This can be improved by showing an image of the church next to the position on the map. I was trying to produce a location and route for a U3A Village Visits group. The result can be found on http://www.salisburyu3a.org.uk/Alderbury/pages/1VillageMap.html
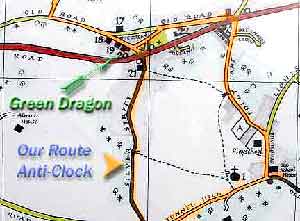
Village Map
There is a convenient space near the church for a small snippet of the church.
From the Village Sign photo, with the church selection made, pick the Move tool from the tool bar. Click inside the selection and drag from the Village Sign photo to the Village Map photo. When the selection is over the Village Map photo the cursor changes to one with two squares.
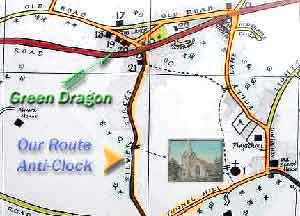
Village Map + Church
There should be handles around the small church. If not tick “Show Bounding Box” found on the Tools Options Bar. These can used to resize this extra image. Remember to hold down the Shift key whilst doing this otherwise you will distort the image. Above is the result.
Try taking the Map image and adding the church and maybe you could find a photo of a pub and place a small version near the Green Dragon.
METHOD 1B
Marquee Method – Elliptical
This is very similar. The differences only come in making the selection. If used just by dragging then this
tool will make an ellipse. It is rather uncontrolled though. By holding down the Alt key an ellipse will be
drawn with the starting point as the centre. If the Shift key is held down then a perfect circle will be drawn.
By holding down the Alt and the Shift keys together then a perfect circle will be drawn centred on the starting
point. You must decide which you need. [See page 64 for further details]
METHOD 2
Lasso Selection
You will find 3 different versions of this in the toolbox fly out menu. These are the
A Freeform Lasso
B Polygon Lasso
C Magnetic Lasso
METHOD 2A
Freeform Lasso
This is perfect for making quick rough selections since the ends of the lasso will join up themselves whereas on the other types this not the case. Being freeform means that you can draw any shape.
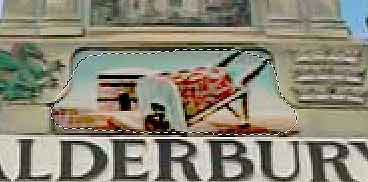
Village Sign with a Selection
This screen shot shows the wheelbarrow selected; feathered by 5 pixels; lightened using Levels. The picture is intended to show that there used to be brick making in Alderbury.
METHOD 2B
Polygon Lasso
This produces freeform selections with straight-line segments. The way this works is akin to stitching with a needle and thread but with elastic thread. Click down where you wish to start. Release the mouse key. Move the cursor aside and a thread appears. Providing that you do not click again you can endlessly stretch and move this. Find the next spot and click. You have now stitched down the thread.
Continue this process around the area you wish to select. When you are near to the start again a small circle appears at the bottom right of the cursor to indicate the start. The circuit will then complete itself when you click. Alternatively you can double click and the section will close or join up.
Note that you can create a Free Form selection with the Polygon Lasso if you hold down both the Alt key and the cursor key together. This is sometimes quite useful in that you can mix the types of selection.
METHOD 2C
Magnetic Lasso
This is used when there is a distinct contrast between the area you want to select and the rest of the image.

Magnetic Lasso Options Bar
As you can see from above there are a number of options. Some of these we have already mentioned.
The Anti-aliased box should be ticked for all photographic work. It stops jagged edges showing where there are any straightish edges at an angle. However there is no Anti-aliased option for the Rectangular or Brush selection tools.
For the Width enter a pixel value between 1 and 40. The magnetic lasso detects edges only within the specified distance measured in pixels from the pointer. This can be changed whilst using the tool by pressing the square bracket [ & ] keys to adjust the focus of the tool. If you are using a tablet the pressing harder will change the size.
To change the magnetic lasso cursor so that it indicates the area of edge detection (the Width value), press the Caps Lock key on the keyboard. This seems the best way to use this tool since you can see which bits that are not required could be selected. The magnetic lasso tends to go astray very easily.
Edge Contrast should be set to a value between 1% and 100%. A higher value detects only edges that contrast sharply with their surroundings; a lower value detects lower-contrast edges.
Frequency should be set between 0 and 100. A higher value anchors the selection border in place more quickly. Experiment with and find out for yourself.
On an image with well-defined edges, try higher Width and Edge Contrast settings, and trace the border roughly. On an image with softer edges, try lower Width and Edge Contrast settings, and trace the border more precisely.
To complete a selection – double click your left cursor key. Note that the Magnetic Lasso creates ‘anchor points’ as it traces out the selection. You can add more anchor points by clicking where you need an extra one as you go along. Alternatively you are able to remove the last anchor point by pressing the Backspace key.
METHOD 3
The Magic Wand
As previously stated the Magic Wand enables you pick areas of similar colour within a span of colour set by
the Tolerance. This tolerance is set on the options bar between 0 and 255. Low settings only allow you to
choose a limited range of colours. The initial setting is 32. Remember that this can be reset using the Reset
control found by clicking on the left-most panel on the options bar.
The Contiguous control allows you to either pick all areas of the same colour throughout the image or only those that are connected in a continuous manner. This means that, if, for instance, you have a landscape that includes trees, you may have islands of sky separated from the rest of the sky. Hence if you have contiguous ticked then when using the Wand none of these will be picked. In this case you choose to remove the tick from this box.
Again the Anti-aliased box should be ticked.

Radial Gradient – from white to grey
Here we have created a 200 pixel square image that has a radial gradient from the centre. This is useful to show how the Magic Wand works. Below for instance the wand has been used at its initial settings and clicked in the centre of the square. So a circle has been selected that encloses colours from white (in the middle) out to a colour value of 32.
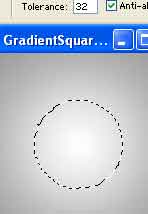
Radial Gradient – Magic Wand Selection
This can be measured using the Eyedropper Tool and opening the Info Palette. The Eyedropper measures various pieces of information about an image and in this case we are looking at the colour values. Remembering that white is 255 we can now see that the Eyedropper is reading colour as 222 or 32 less than pure white when placed on the marching ants line.
Note that this only occurs if the exact centre or 255 point is chosen to place the Magic Wand. Incidentally the Info Palette will show the colour values when using the Wand as well.
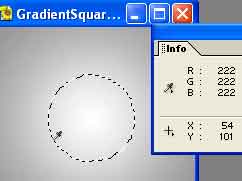
Radial Gradient – Magic Wand Selection + Colour Info
Now if we use the Magic Wand to our Village Sign photograph then clicking in the sky area we find that we do not select all the sky. This is seen here.
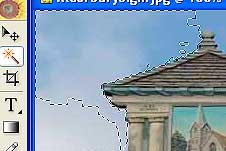
Village Sign – Magic Wand Sky Selection
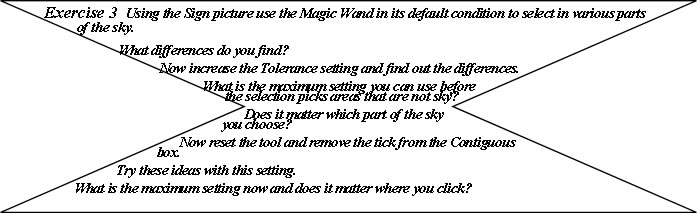
We can try increasing the value of the Tolerance to include more sky.
METHOD 4
The Brush Selector
This is special to PSE2 and is not found in other versions of Photoshop. It is also very useful and easy to use. It makes selection easy and additionally allows you to tweak selections made by the other methods by painting on your image. So it can modify an existing selection.
There are two ways to view and work with a selection. These are the normal Marching Ants and a Mask View. Even though these look different they both allow you to make selections.
This selection method is a joy to use once you have understood how to use the shortcuts.
To select the Brush Selector tool you can pick it from the toolbox BUT it is quicker to press the letter A on the keyboard.
Use only the default and possibly the square brushes.
You will need to alter the brush size often. You will need a large brush to start to cover large areas. As you progress smaller and smaller brushes are needed as you get to the finer detail. Change the size of the brush by pressing the square bracket keys. The [ key to reduce and ] key to increase the size. This is by far the easiest way especially if you have set the Preferences to show the brush size. If not then go to Edit> Preferences> Displays & Cursors. Click Brush size option.
If you have accidentally gone over an area that you did not wish to select press the Alt key and the tool will go in reverse and start to deselect.
To sum up use A ,[ , ] and Alt. (Do not use the commas of course!)
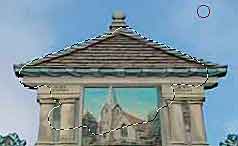
Village Sign – Brush Selection
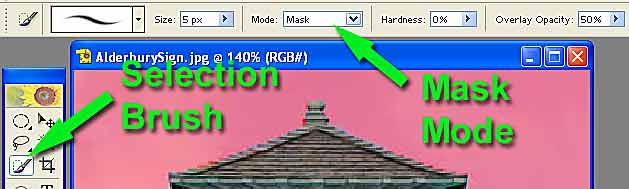
Brush Selection Options
Change to the Mask Mode from the options bar and a red splurge appears over the image. This red region covers the area you are protecting. It is a bit like using masking tape when painting a house window frame.
Now by using a soft brush you can modify the selection and the softness of the edge. For some purposes a hard edge is needed. In other cases a soft edge is needed. If you want merge a selection with another image then it is recommended to have a softness or feathering of about 1 or 2 pixels. This allows the cut out to blend smoothly.