
We thought we should break down the ideas into sections.
1. Shortcuts
2. Moving, Copying and Deleting files
3. Renaming files
4. Views of files in My Pictures
5. Backing Up
6. Cleaning, Defragmenting and Maintenance
7. Protection from nasties
8. The Standby mode
You may well know a lot of these already but if we are anyone to go by there will be some surprises.
1.0 Shortcuts
1.1 Using the Windows key 
1.1.1 Windows Explorer Windows + E
1.1.2 Minimize or Restore all open Windows Windows + D
1.1.3 Search for files i.e. Find files Windows + F
1.1.4 Help and Support Windows + F1
1.1.5 Open the Run box Windows + R
1.1.6 System Properties Windows + the Break key
1.1.7 Open Utilities Manager Windows + U
1.1.8 Lock your keyboard [you need your password to unlock] Windows + L
1.1.9 Undo Minimize all Windows Windows + M
1.2 Other
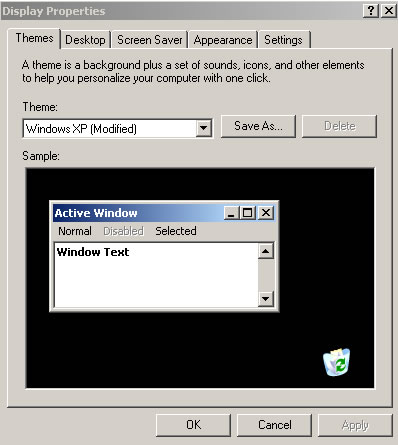
1.2.1 Right Click on the Desktop will open a Menu with useful items. These include arranging the Desktop
Icons, and Properties box as shown here. Within this box you can see Tabs that you can use to control
how Windows looks on your screen. Let us examine some of these.
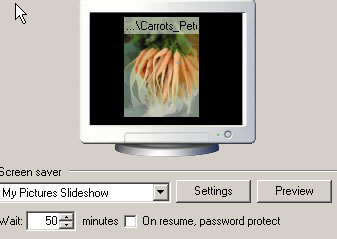
For instance click on the Screen Saver tab. You then get a screen as below. Here we have selected My
Pictures Slideshow from the drop down list. The Settings and Preview buttons can be clicked to check
how this will appear.
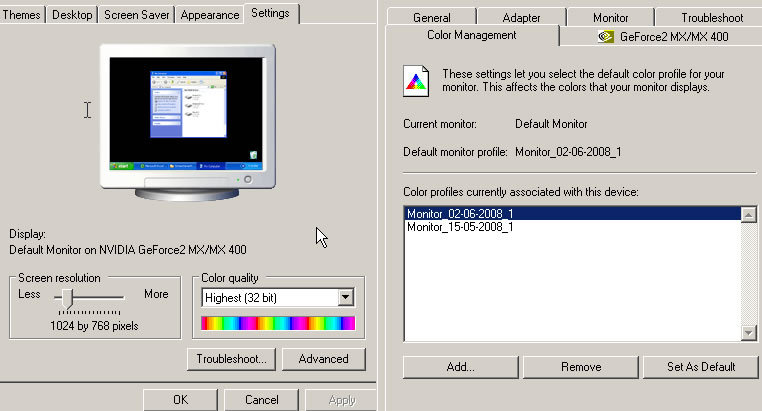
The Settings tab is also useful as can be seen below. Here you can alter the Screen Resolution with
the slider bar. Also the Advanced button gives access to Colour Management etc.
Note that the Colour Quality is set to Highest (32 bit). Always use this setting.
Have a play with all the other tabs and find such gems as how long your monitor stays active before
it goes into sleep mode.
1.3 Using the Windows or Start key
1.3.1 Normally you will use the left mouse to open a menu from which you choose the operation you want
with another left mouse click. However never forget top try the Right Mouse key. For instance on the
My Computer menu item you get another menu one item of which is Manage. Left click on this and another
box opens called Computer Management. From this you Defragment your computer and see the Device Manager
plus lots of other things too that we need not worry about.
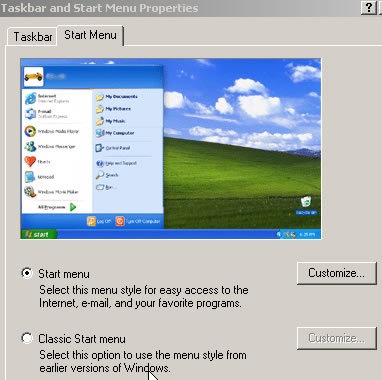
1.3.2 If you click the key with the Right Mouse key you
open up a useful menu that enables you to control the appearance of the Toolbars. From the Menu pick
say Properties and the box shown below appears. Left click the Customize button to alter how your computer
starts up and using the Taskbar tab how the area at the bottom of the screen known as the Taskbar is
seen. It is well worth while trying out things here. No harm will come to your computer. This box can
be reached by Right Clicking on the Taskbar too from Properties.
1.3.3 The TASKBAR. This contains the Start or Windows button and if desired a series
of small icons for the most used programs. This is the Quick Launch toolbar. Then follows Buttons of
already opened Programs with their name on. If you left click on these you can Minimise or Maximise
the Program. If you right click on a button then you can Restore
or Close as shown here.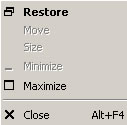
Note the Shortcut to close a Program is Alt + F4.
On the right side there is the clock and other icons of other Programs such as your Virus Protection,
the Volume control, the clock etc.. This is the Notification Area and can be customised. This automatically
closes to hide some of them. Also there can be other items. These are controlled using the Right Click
on the Taskbar. Click on Toolbars and a side menu opens listing the possible other things you can have
displayed. If the Lock Toolbars is not ticked then you will find a raised beveled line. By straddling
this a double arrow appears as here.  Left or Right click and drag
this bar left or right to show just what you want. Then Right click the Taskbar and Tick the Lock toolbars.
The raised bar vanishes.
Left or Right click and drag
this bar left or right to show just what you want. Then Right click the Taskbar and Tick the Lock toolbars.
The raised bar vanishes.
Right Clicking in the Notification Area opens a menu. This allows you to alter the clock and similar items to the Toolbar Menu.
2.0 Copying, Moving and Deleting Files
2.1 Open either My Documents or My Pictures or My Computer. The quick way is to press Window key +
E (see 1.1.2).
2.2 Navigate to a folder you wish to see using the panel on the left side. The highlighted file will
show in the right hand panel.
2.3 Selecting Files. Move your cursor over a file name or thumbnail and it will be highlighted. You
do not need to click. If you do some action will occur such as XP will open Photoshop and open a photo
there. This happens even if you do not want this to happen. So beware.
2.4 Selecting Several Files. If you now hold down the CTRL key and move the cursor over any other file
this too will be highlighted i.e. selected.
2.5 If you want to select many files hover over the first file whilst holding down the SHIFT key. Move
across to the last file of the series you wish to select and hover over this file. The whole set is
selected. This needs a bit of practice.
2.6 If you want to choose ALL the files in a folder the quick way is to press CTRL
+ A (where A = ALL).
2.7 Having selected your files you can now Move or Copy or Delete them.
2.8 We have found that to Move or Copy it is best to have two versions of My Pictures or My Documents
or My Computer. Having opened two copies try Right Clicking on the Taskbar whereupon a menu pops up.
This is the Toolbar Menu with facilities greyed out before such as Tile Windows Vertically. This is
very useful when pushing files about since the two opened items occupy exactly half the screen each.
2.9 Let us suppose that you want to Move or Copy files from a Folder that you have navigated to to
another area on your computer.
2.10 Now Left Click on the File you want to Move or Copy and without letting go of the left mouse key
move across to the second screen. Find the place you want to move the file to.
2.11 If you wish to COPY this file i.e. make a duplicate then hold down the CTRL key and release the
mouse key. Note the cursor should change to have a Plus sign attached telling you it is copying.
2.12 If you wish to MOVE this file then merely release the mouse key.
2.13 There is another variant. If you press the ALT key before releasing the mouse key you will see
that the cursor is again different this time a curved arrow indicating that a Shortcut only is being
transferred and not the actual file.
2.14 To delete the file or files highlighted you can press the DELETE key. Or you could click and drag
them to the Recycle Bin found in the left panel usually right at the bottom.
2.15 Remember that this process can be applied to FOLDERS too.
3.0 Renaming Files and Folders
3.1 Having navigated to a folder such as a Picture folder of a place you have recently been you often
see that the photos are named as your camera decides. And horrible the names are. These are easily
renamed with XP simply by Highlighting the file or files and then pressing the F2
key. The name of
the file is now highlighted. Now you can just type in a new name such as the place. If the camera
photos were in JPG format then it is vital to type this in also so your new name might be SalisburyFair.jpg.
3.2 But how do you know what these letters are for other files since you probably cannot see them?
This is another simple thing that you can do to display the whole file name instead of the shortened
version that is the norm.
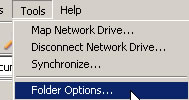
3.3 To do this got to Tools in the menu bar at the top of the My Pictures box and click on Folder Options.
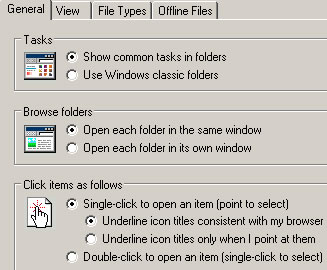
3.4 The following box comes up. The dots are in the optimum places we think. Now a single click on
an item will open it rather than a double click. You may not like this but we find it most useful.
3.5 Click the View tab and the following box appears.
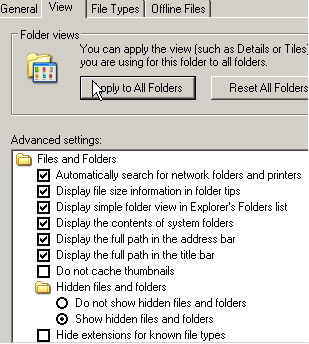
There are many choices possible here but we want to point out two. The first is the dot in Show hidden
files and folders and the second is that the tick in Hide extensions for known file types is removed.
Having clicked OK to these settings all the files will show the file type such as .tif or .psd or .jpg
etc.
4.0 Views of files in My Pictures
4.1 At the top of the window of a Picture folder there is  . Click on this for a menu to appear as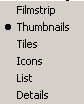
By clicking on the appropriate menu item so the display of the photos is altered.
4.2 Now it may be that the way the photos appears every time is not how you want it and you will find
yourself going to this control to alter the display. This can be very annoying. But XP can cope with
this.
4.3 First open a folder and adjust the display that you want every time and then go to this display
as in 3.5. Click on the Apply to All Folders button and then click OK and it is done.
4.4 Now you may have noticed that if you have a screen showing sets of Folders that some of the Folders
have 4 small photos on them. How is this controlled?
4.5 By right clicking on a Folder icon a drop down menu appears. Select the Properties at the bottom
and a box comes up and by clicking on the Customize tab you obtain the following
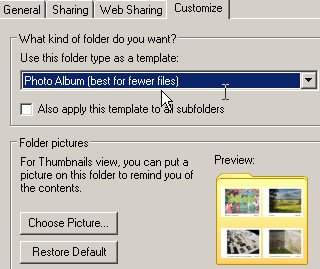
4.6 By clicking on the blue section another menu appears with a choice of Folder types. We have picked
a suitable one for photos.
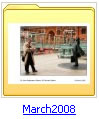
4.7 Clicking Choose Picture means that you find a photo you like and this can be the single picture
that will appear on the Folder cover. As shown below.
5.0 Backing Up
5.1 To make a backup you need a separate place that has sufficient memory to hold all the required data.
This can be a CD or DVD ROM or another Hard Disk Drive internal or external. Professional still use tape drives but I do not think these are practical for home use. The ideal would be to use a combination of CD or DVD Roms as an Archive and an external hard drive.
5.2 Here I initially thought I would be telling you to find the XP backup system or to obtain a backup programme of some sort. There are many of these and I have tried some of them. None have been satisfactory. The nearest has been Norton Ghost but I did not ever have to use it in earnest and I did wonder if I had set it up correctly. These programmes attempt to backup from a specified place in your computer to another place. This can be the same or preferably another hard drive. They can be set to do this at set intervals and to only put across any changes since the last backup. But this process always occurs at the wrong time or when the computer is off and it can slow down the computer drastically. But all this can be done manually.
The most necessary thing to remember is that you should keep at least two copies of your important files. Now this is difficult if you have lots of Photos for instance. They take up a lot of space.
5.3 Having talked to IT Computers the best way is the easiest way and we have already discussed this indirectly in para.2.. All we need to do is extend the principal a little.
Follow para. 2.8. Do not forget to COPY the files as explained in para. 2.11. Also remember that whole Folders can be copied to a backup system just the same way.
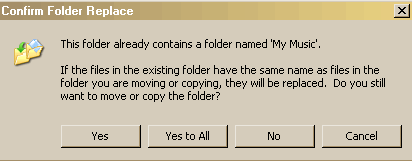
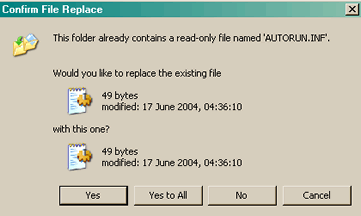
You can now make a Backup of any part of your computer or all of it when you wish. You just have to remember to do this on a regular basis. A useful part of XP and Vista and Windows generally is that if you try to Copy across a file that is already present the computer will ask if you wish to overwrite it with this new one. There are useful options that can be seen below so that you can replace all the files or just those that have altered.
5.4 CD ROMs.
These can be useful to store about 650Mb of files. They are cheap and cheerful. XP can be used successfully
to make CD ROMs.
5.5 DVD ROMs
These are much the same as CD ROMs but have about 10 times the capacity. 5Gb is about normal and clearly this can hold a lot of, say, photographs. Perfect for archiving.
5.6 External Hard Disk Drives.
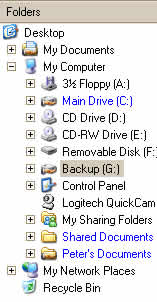
These have reduced greatly in price now and are now well worth buying. An external hard drive is very useful and these days a 500Gb disk costs about £50. When installing you can ignore all the CD ROMs that come with the disk since XP has a Plug and Play system and this should find your new drive and install automatically. It is given a drive letter such as G:. So now you will have something like an A floppy drive, a C internal hard disk drive and perhaps D: a Removable Disk for the Card Reader. Note there is never a drive B: for historical reasons. An example is shown below:-
6.0 Cleaning, Defragmenting and Maintenance
Windows has several helpful ways to ensure your computer runs smoothly and as fast as it can. As we use Programmes like Word or Photoshop we will leave small traces when we delete a file or simply shut it down. Word often does this. They can be called Temporary Files but they are will remain forever unless you clear them out.
6.1 Disk Cleanup
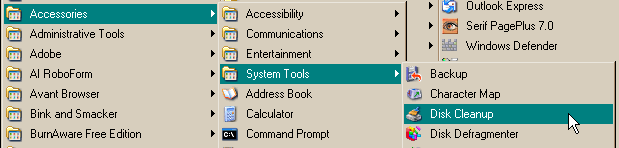
This found by pressing the Windows Start key and then the All Programs key. Find Accessories then System Tools then Disc Cleanup as shown here.
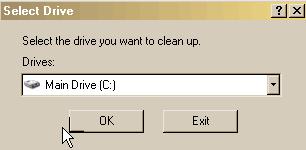
Having clicked on this a box appears from which you choose which drive to clean.
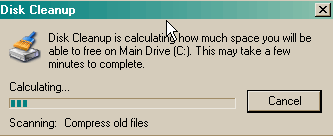
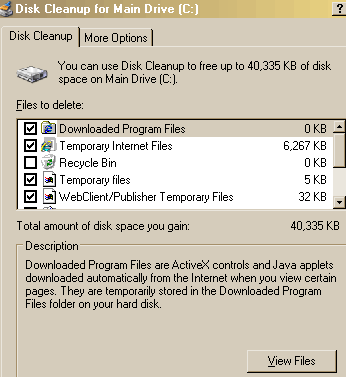
Allow this to run its course. When this finishes you get more questions and decisions to make. The square boxes on the left side can be left as given or removed or added. Here the Recycle Bin is not ticked but it could be. The Description below gives some idea of what you will be deleting in this operation. For some you can see the the files by clicking the View Files button. In this example there appears to be 40Mb to remove. Click OK to complete the operation.
6.2 Defragmenting
Having gone through the process in step 6.1 above it is as well to Defragment your drive and Windows has a way to do this.
Again find Accessories then System Tools then Disc Defragmenter. Simply click on this and the following box appears:-
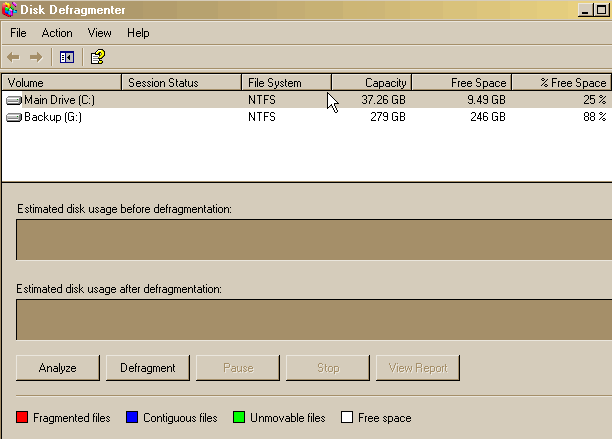
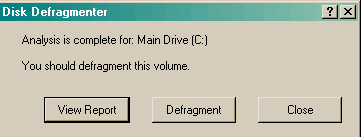
The first step is to Analyze the chosen Drive [here either C: or G:]. The analysis will take some minutes to complete. Then you see

As you can see you may look at a report that tell you which files are fragmented and how many fragments plus other data.
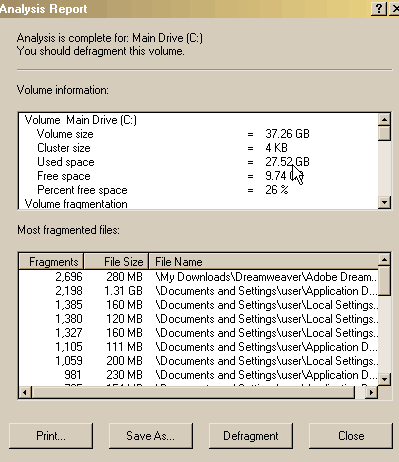
Now press the Defragment Button whereupon Windows goes through the Analysis again before it begins to sort out you disc.
The longer you leave this operation the longer it takes to perform. You may find that you have to leave your computer on overnight! But you can press the Stop button. Then you can begin again later from where you finished defragging.
Note that you must have 15% or more Free Space for this system to operate.
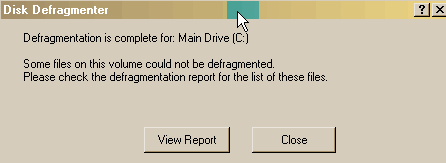
The Report here is similar to the previous report except that the bottom area shows the files it could not defragment.

Above is the defragmented result. Compare to the pre defrag result above.
6.3 Maintenance
This covers a wide range of possibilities and I can only outline a few of them. The methods are Free to use programmes that can easily be downloaded and installed. Some you probably have already [such as Virus Protection].
6.3.1 General Cleaning
There are two suitable candidates ATF-Cleaner and CCleaner. I use both regularly even after the Windows Disk Cleanup as in 6.1.
Both these can be found with Google and safely downloaded. The CCleaner firm also have for free Recuva [to recover deleted files] and Defraggler [you can Defragment individual files with this].
7.0 Protection from Nasties
What are nasties? It is software developed for the purpose of doing harm. According to Wikipedia there are many versions of Malware. Take a look at the link if interested.
They are called Viruses, Worms, Spyware, Bots and Trojans [is a piece of malware which appears to perform a certain action but in fact performs many different forms of codes. Therefore, a computer worm or virus may be a Trojan horse. The term is derived from the classical story of the Trojan Horse.]
In addition there are things like the decompression bomb, a type of denial-of-service attack, in which a small compressed file expands to an enormous size, requiring large amounts of system resources and possibly causing the software or the entire system to hang All major web browsers are vulnerable to the attack.
Do not be mislead by phishing. This is the criminally fraudulent process of attempting to acquire sensitive information such as usernames, passwords and credit card details, by masquerading as a trustworthy entity like your own bank in an electronic communication. Just delete without opening any such email.
7.3.1 Malware Cleaning
7.3.2 Anti Virus Protection
7.3.3 Registry Cleaning
7.3.4 Firewalls
7.3.1 Malware Cleaning
Vital programmes here are Adaware, Spybot and Windows Defender.
You can easily install all these and then use them to clear out various nasties that get past your other on-line defences. I also use Spy Guard but I think this has been replaced by Spy Blaster. This is working all the time to guard against certain web sites infiltrating files into my computer.
Again download these using Google to get to the relevant sites. They are all free.
7.3.2 Anti Virus Protection
There is one very good programme here and that is AVG. But you can also use Avast..
7.3.3 Registry Cleaning
This is a sensitive area that requires care. The Registry is a huge file that Windows
installs on your computer. It is used by most installed programmes. As Wikipedia puts it
The Windows
registry is a directory which
stores settings and options for the operating
system for Microsoft
Windows 32-bit versions, 64-bit versions, and Windows
Mobile. It contains information and settings for all the hardware,
operating system software,
most non-operating system software, users, preferences of the PC,
etc.
When you remove a Programme using the Windows Add/Remove Programs system there is always pieces left over sitting in the Registry. After some time the Registry can get even bigger and slow down your computer. So these must be cleared out regularly.
CCleaner is good for this but it will not be very thorough. So I always use another programme called Wise Registry Cleaner. This is simple to use and has a colour coding with Green entries safe to remove and Red entries that may not be.
7.3.4 Firewalls
A Firewall is a way of defending your computer from destructive forces.
A firewall can block malware that could otherwise scan your computer for vulnerabilities
and then try to break in at a weak point. The only way to make a home computer 100% secure is to
turn it off or disconnect it from the Internet. The programmes in paras 7.3.1, 7.3.2 and 7.3.3 are all
there to remove things that have managed to get through the firewall.
These can be in software or hardware form. The latter are superior but the software versions have proved very reliable.
XP has its own Firewall but many people think that it is fairly poor. But there are FREE
firewalls available such as Comodo that
has a good reputation and Free
Zone Alarm. This latter works well and automatically updates.
I am currently using PC Guard that comes with Virgin Media and also has Anti Virus capabilities.
Most of these recommended programmes have been recommended by Rick Maybury. His site is well worth while examining.
Additionally I use Shields Up on line from Steve Gibson's site to check on any vulnerabilities. Find this on http://www.grc.com/default.htm. If your Anti Virus system is not adequate this site will reveal where it is weak. It is fascinating to run this programme as well.
8.0 The Standby Mode
to be continued
I have found a similar web site to this and if you get stuck here then maybe this site has a better explanation. Find this Home and Learn site HERE