
Using Adjustment Layers allows you use many of the image adjustment controls that are normally used from the Image > Adjustments (Photoshop) or Enhance (Elements). Why would you want to do this? The answer is that these special layers can be saved with the image and reopened at a later date and then you can readjust the layer controls. If these controls are used directly then you cannot undo the effect if history is cleared such as when you save and close down the image file.
A significant advantage of Adjustment Layers is that they add very little to the size of a file unlike normal layers.
The adjustment layers can be reached from the bottom of the layers palette using the Black & White Disk or Circle.
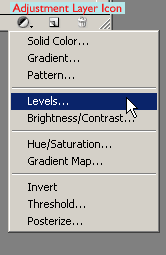
You can see that there is a good choice of controls and you will mostly use Levels and Hue/Saturation.
1. Try opening an image but use only a Duplicate version and then selecting the Levels Adjustment Layer. Straightaway you find that in the Layers Palette a new layer is shown. It looks like the screen grab here.
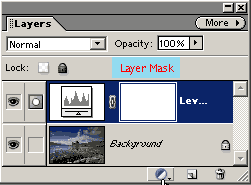
At the same time the Levels box opens just as normal. Try adjusting the controls as you would have done in the normal direct way. Click OK.
One of the great things about Adjustment Layers is that you can reopen them at any time even after saving in TIFF or PSD. This is done by double clicking on the icon of the Levels. Now you can change the settings.
A second great facility is the Mask. This is placed alongside the Levels icon in the form of a white rectangle. By using the standard brush you can paint on this Mask. Doing this allows you to reveal the pixels of the image as it was prior to using the Adjustment Layer. So, for instance, if you used Levels to make the whole image darker then by using the brush on the mask you can reveal the state of the image where you paint.
2. Now check that the foreground is Black and set a reasonable brush size. The brush size can be quickly altered by using the [ and ] bracket keys to decrease or enlarge respectively. It is best if the brush is as soft as possible. The Opacity of the Brush is a crucial factor too. Often you will be using only 10% even less. Change the Opacity quickly by pressing 1 for 10%, 2 for 20% etc. 0 for 100%. 02 for 2% and so on.
3. Brush over a part of the image that you think needs to be as it was originally. Do not worry if you make errors since these can be corrected by pressing the X on the keyboard and repainting.

4. There is second way of controlling particular areas that is a bit more direct. This is to make a feathered selection by some means such as the Freehand Lasso. Then click on the Adjustment Layer icon at the bottom of the Layers Palette. The marching ants will disappear but an Adjustment Layer in, say, Levels will appear with the your selection showing as a white patch on the Mask. Adjusting the Levels box will only affect the area selected. Again the joy of Adjustment Layers is that you can change the area that is affected by using the Brush tool as before. This is very useful if the selection darkened an area and you want to extend this darkening elsewhere. Bear in mind that changing the Opacity means that you darken another region to a lesser amount but not more. If you need to darken still further then simply make another quick rough selection and make another Adjustment Layer. An example of this thinking is shown here with 3 Adjustment Layers of Levels.
5. There is another clever method that does not use Adjustment Layers but enables you to modify areas easily that should be mentioned here. By requesting a new layer from the main menu bar under Layer menu and selecting Soft Light Mode a further control becomes available namely Fill with Soft-Light-neutral colour (50% grey). Tick this and you get a layer that is filled with mid grey.
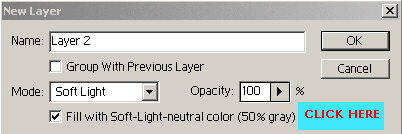
Using a brush on this at a low percentage opacity (10%) allows you to lighten when White is Foreground and Darken when Black is the Foreground colour. This is quick and easy. This is shown as Layer 1 in the screen grab above.
6 Remember Levels is only one of the choices. Another favourite is the Gradient Map. This will convert your photograph into a Black & White image. The only one we do not recommend is the Brightness & Contrast.