
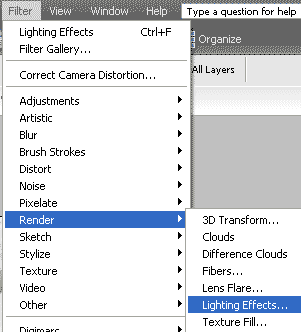
There is a little known filter that can on occasion be very useful in perking up an image. In practice it is a bit hard to see clearly how the effect will work on the rather small thumbnail. This filter is found on all versions of Photoshop that you are likely to use. It is under the Filter Menu > Render section.
So to use the Lighting Effects filter open up a suitable image and then open the filter dialogue box. This looks like this screen grab below.
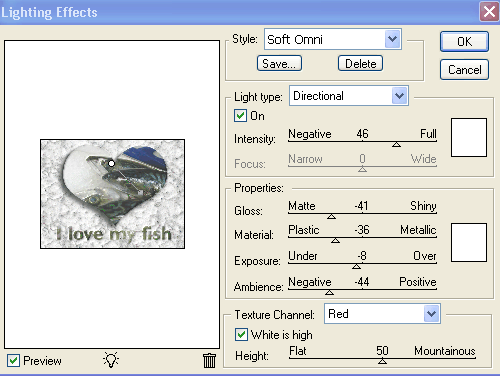
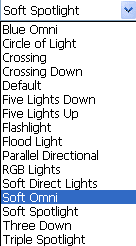
Within this dialogue box the first thing to note is the Style drop down box. This has many options as shown here. If you use the Save button you can save a setting you are happy with and will be added to this list for later use. The ones shown are the standard styles.
Next note the Light Type box. Here we have 3 options namely Directional, Omni and Spotlight. Below this you see that the Intensity can be affected and depending on the option chosen the Focus is accessible too. This concentrates the beam of light.
Below this area is the Properties section. Play with these controls as you see fit.
Perhaps more important is the Texture Channel section currently set to Red and Height of 50. This setting controls a roughening effect. Just go easy on the amount here. It is easy to overdo it.
Having set up your Lighting Effects as required click the OK button.
There is one more control, however, and this is the light bulb at the bottom of the box. Click and drag this onto your Preview and you can now add another set of lighting effects. You can save these in the same way as before.
Now let us try out this wondrous filter on an image. Here we have chosen a poster image I Love My Fish.

It looks a bit flat. So first 1. Duplicate the Background layer by Layer > Duplicate Layer and OK.
2. Because we do not want to have the effect all over, in this case over the Heart shape, we can mask this off.
3. Using PS Elements the easiest selection method is the Selection Brush tool. On PSE 4 & 5 it found under the Magic Selection Brush. Set the tool to Mask. Use a large Brush at 50% hardness to begin and be fairly rough in using it. Do not worry about going over the edge because you merely press the ALT key to remove selection areas.

In Photoshop you have the Quick mask to do the same thing. Use a 50% hard brush. You now paint on the area you wish remove the effect from with the red mask. To remove errors use the eraser with the same brush settings. All you need when going over an image are the Q, B and E keys for Quick mask, Brush tool and Eraser. This is the easy way to change from one to the other.
As you get into the detail reduce the brush size using the [ and ] keys and perhaps zoom in. Having masked the Heart in this case click on the hand tool and the selection will be revealed.
4. Select Lighting Effects filter.
5. Use the Style = Default
6. Intensity = 35 & Focus = Wide.
7. Texture Channel to Red and Height =12 [this depends on the size of the original file]
8. Press OK.
9. And there it is.

10. If not happy with the result Ctrl + Z and try new settings in the filter.
11. An alternative way [there are always other ways to do things in Photoshop] is to use a Layer Mask and painting on it. In Photoshop this is done by clicking on the Mask Icon at the foot od the Layers Palette to make a mask. In Elements you just need to be crafty. First make an Adjustment Layer [which one is not relevant]. Make no adjustments just click OK. You will see a blank white mask alongside the Adjustment Layer icon as seen here.
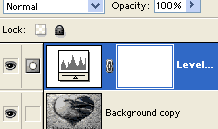
Now drag this Adjustment Layer beneath the Background Layer copy.
12. If you have several other layers for your image then in order to ensure that the mask only affects the part you want then you must use the Group with Previous [Ctrl + G] command. So select the Background Layer copy now the top layer and press Ctrl + G as shown below.
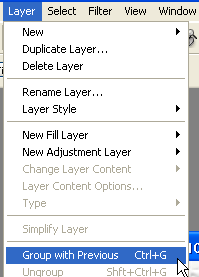
13. You should now have a layer palette like the one illustrated below.
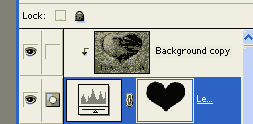
14. Now with a suitable Brush selected and Black and White as the colours on the palette and with the mask selected - check this by noting the small border around the mask as seen above - paint over, say , the heart shape so that a black shape is seen on the mask. As you do this you will see that you are revealing the layer beneath.
15. Because of the complexity it is clearly advisable to use the first method but the idea suggested here can be useful for many other image problems.
Another result is shown here of a Lakeland scene by Crummock water. Although the sun is shining from the left the hillside is still a bit dark. The Lighting Effect filter has changed the emphasis of the lighting. This was the simplest setting using Directional.
A useful site on this topic is http://www.webreference.com/graphics/column15/
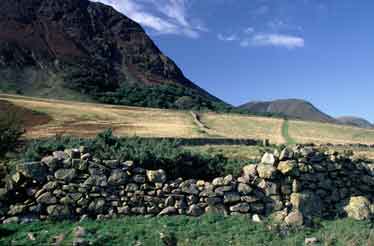 Before
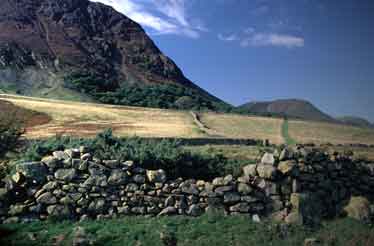 After.